Administration Interface
All configuration and management of CBP is done via a responsive web app. The web app is divided into the following parts.
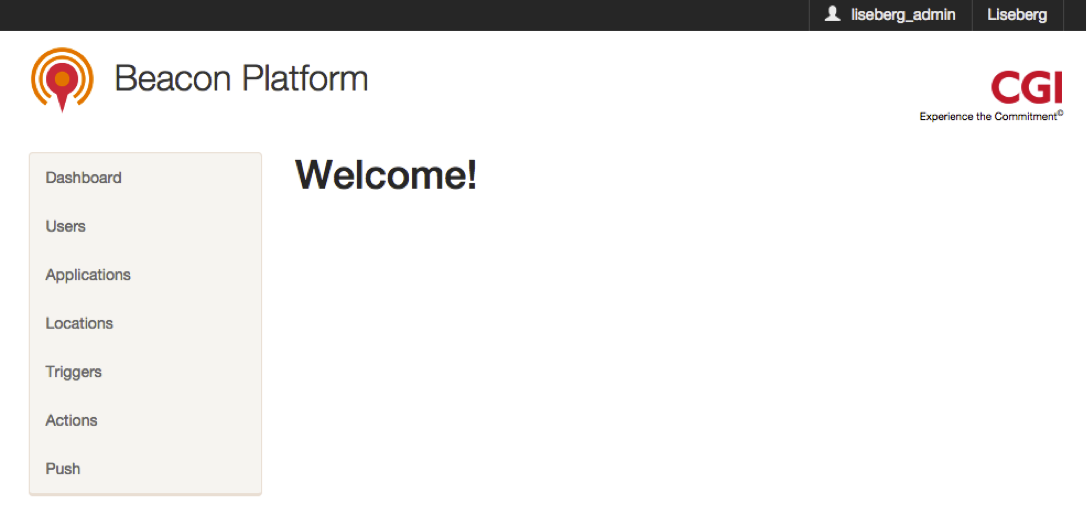
Start page
The start page for the administration interface is shown in the image below. To the left there is a side menu that shows what options are available. Clicking on an option will lead you to the corresponding module.
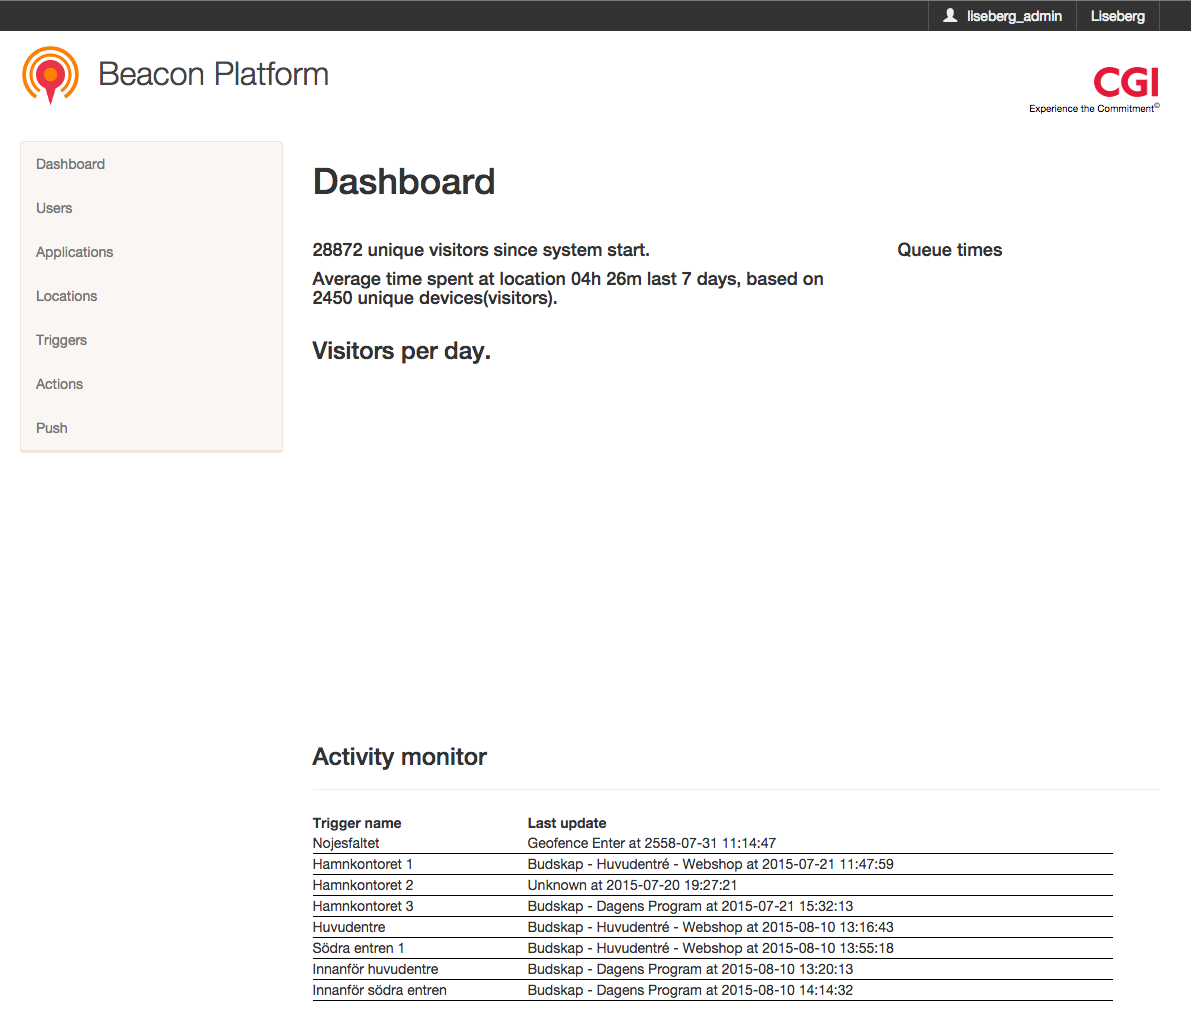
Dashboard
The dashboard gives an overview of the number of end users in the system, as well as logging each individual beacon and action performed in real time. This is a great way of getting a quick view of usage and that everything is configured correctly and all beacons are working. Each application can also add custom dashboard views as an additional option.
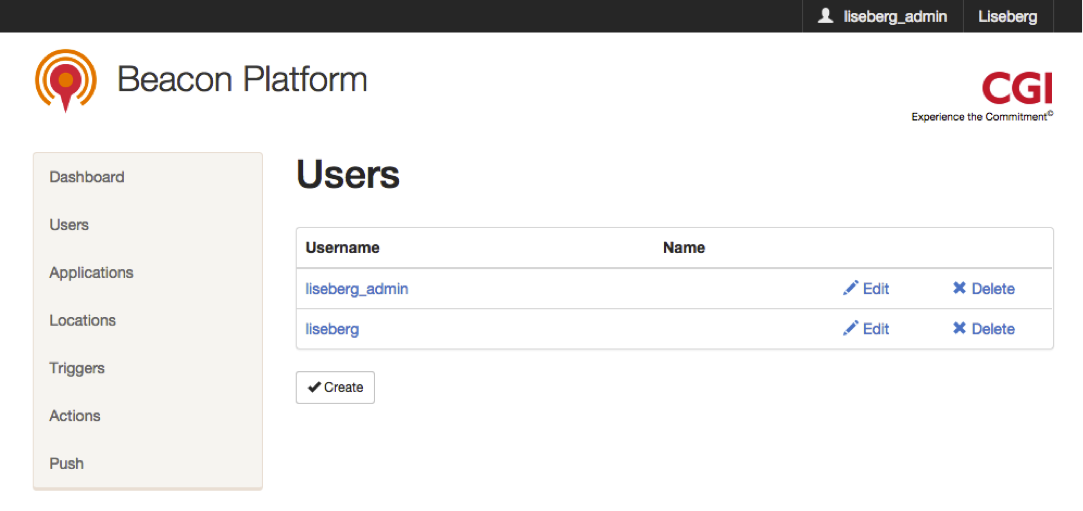
Users
The users module shows which users are available in the current account. You can edit or delete theese users at the page shown below. There is also the possibility to add a new user by clicking on the Create button located below the users list.
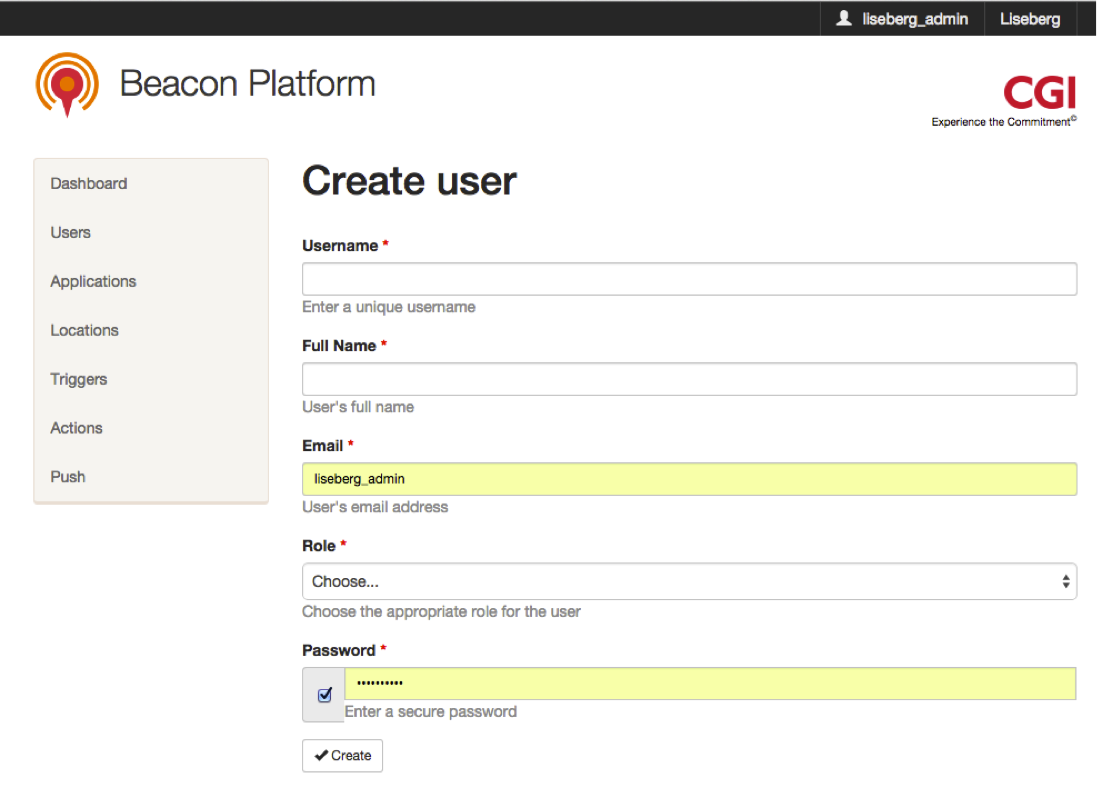
Create user
On this page the logged in user can add new users with the same or lower ranked role as himself. The attributes that have to be set for a new user are Username, Full Name, Email, Role and Password (all are required as seen on the image below).
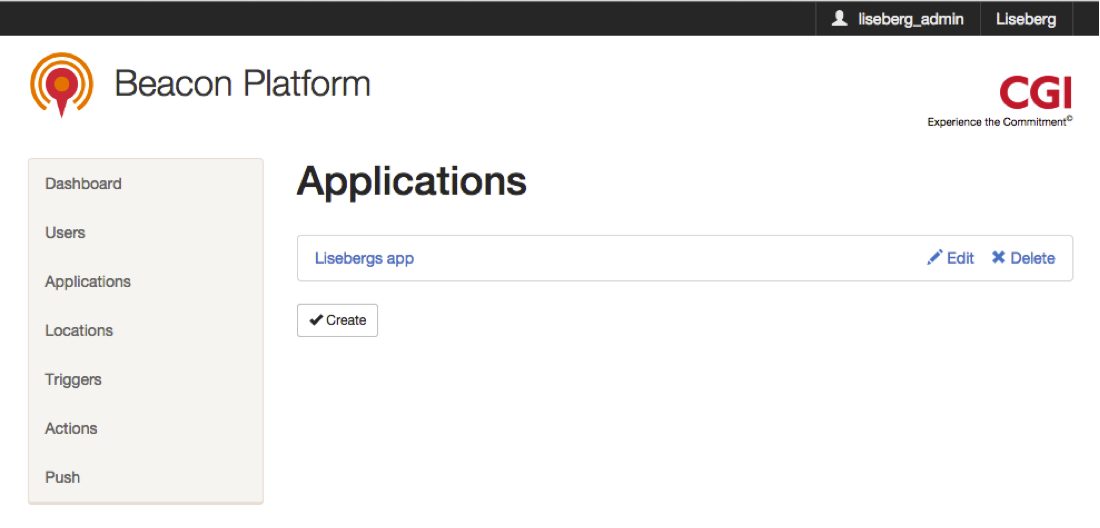
Applications
On this page you can edit and delete existing applications. You can also create new applications by clicking on the Create button.
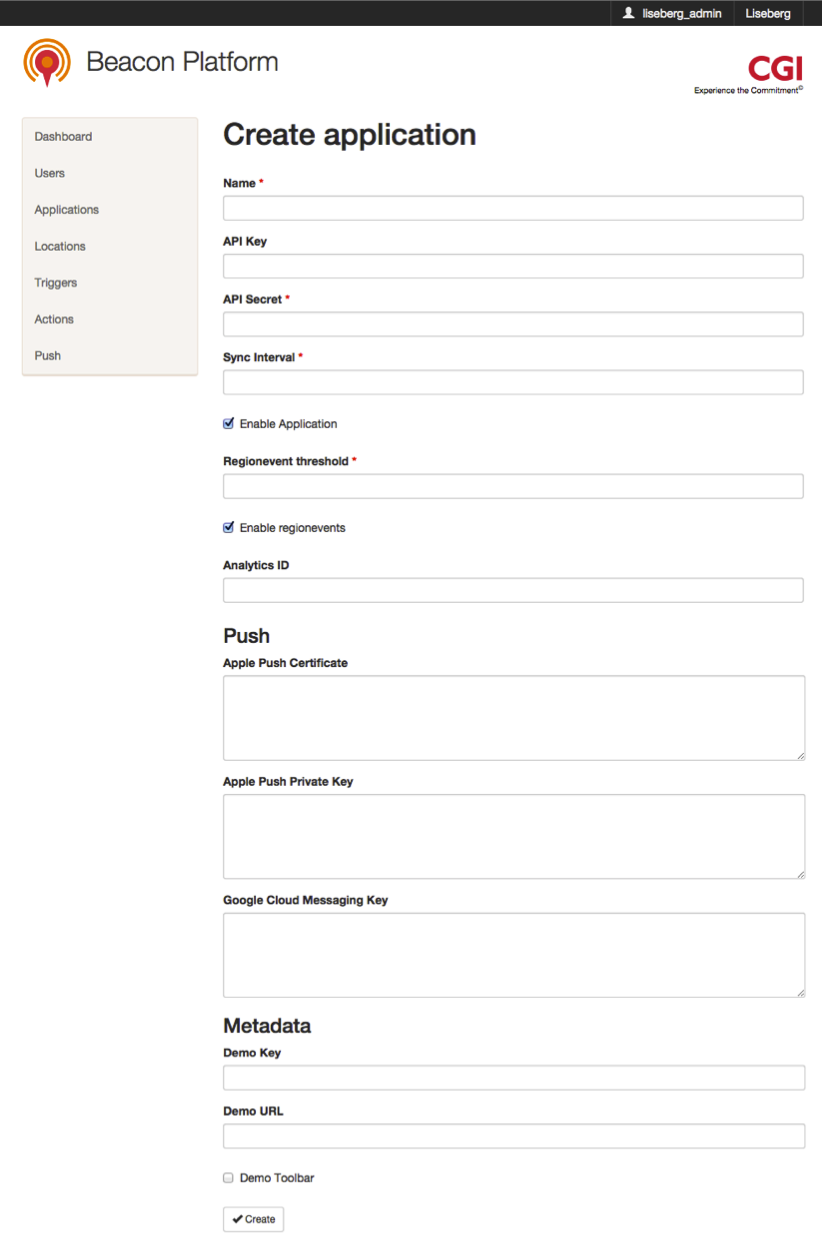
Create application
This page is used for creating new applications. The attributes for a new application are several as seen in the image below, but the required ones are: Name, API Secret, Sync Interval and Regionevent threshold.
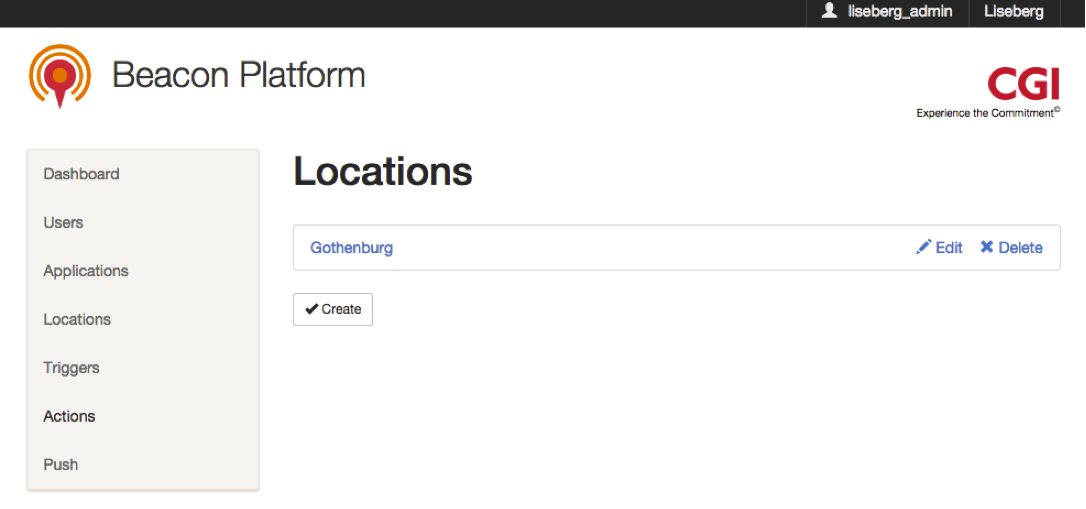
Locations
On this page you can edit and delete existing locations. To create a new location click on the Create button.
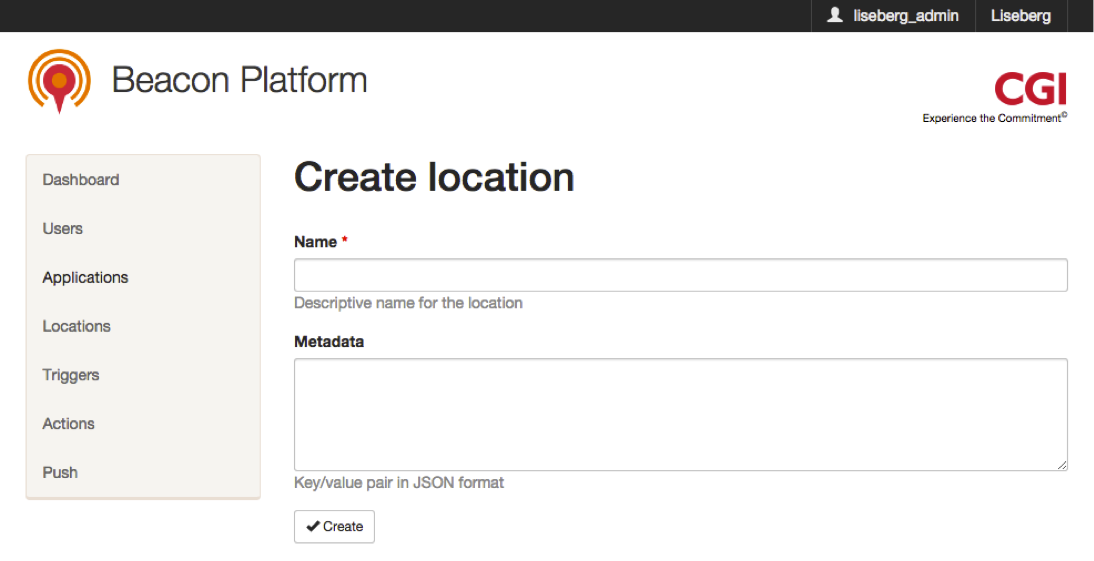
Create location
This page is used for creating new locations. The attributes for a new location are Name (required) and Metadata.
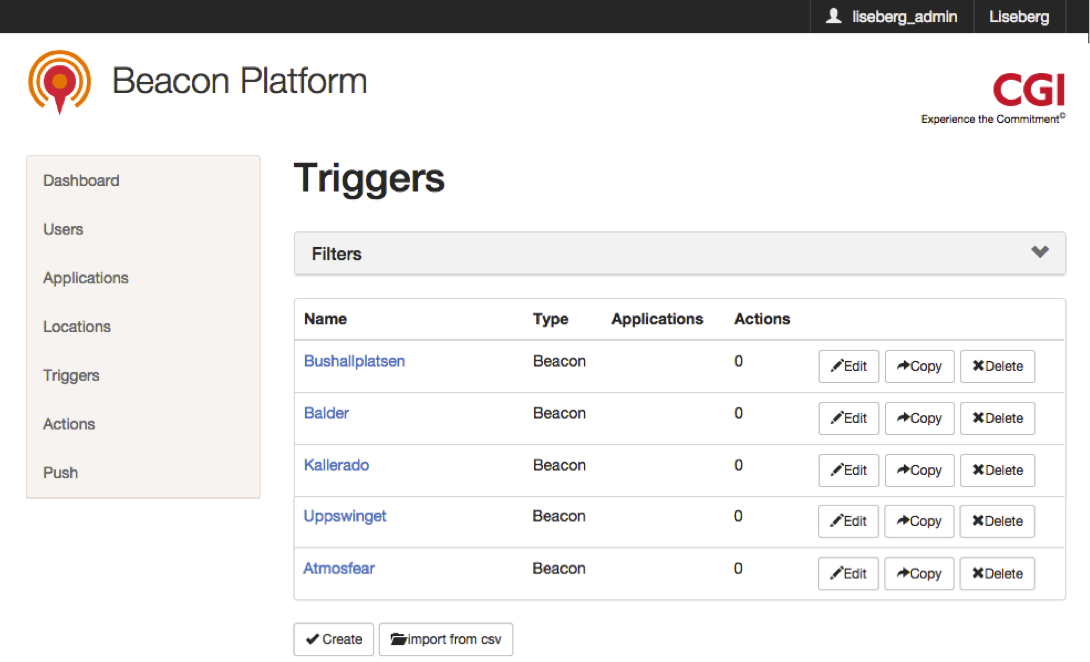
Triggers
On this page you can edit, copy and delete existing triggers. A trigger is either a Geolocation or a Beacon. In the future new trigger types will be added.
If you click on the Create button below the list you will navigate to the Create trigger page where you can add one trigger at the time. If you prefer to add multiple triggers at the same time you can click the Import from csv button.
Filter triggers
On the top of the Triggers page you can filter the list of triggers if you click on the grey Filters field.
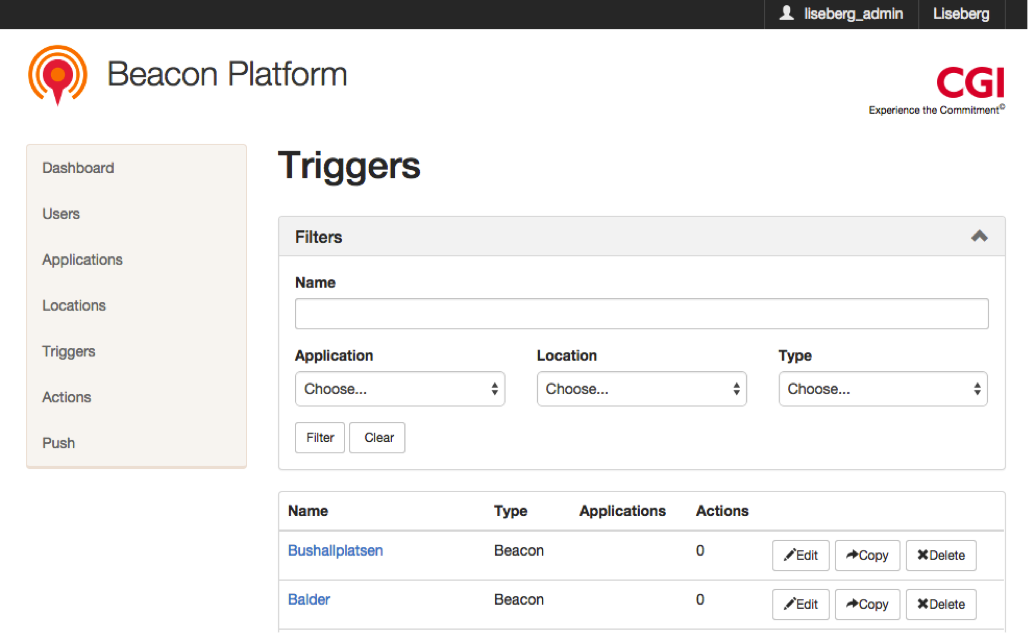
There are four options that the list of triggers can be filtered on: Name, Application, Location and Type. The Name option is a text field where you can fill in a text and search for matches in the names of the triggers in the list. The other three options are pickers where you can filter on a specific Application, Location or Type. If you leave an option picker on the deafult Choose.. setting then the list of triggers won’t be filtered on that option (default behavior). You can also combine the different filter options.
When you have filled in your desired settings, you click the Filter button to apply the filter on the list. If you want to clear all the filter settings back to the default setting, click the Clear button.
Disconnect trigger from application
If the data from a trigger doesn’t seem to be correct, then the trigger can be disconnected from the application. This is done as a first measure until the actual issue with the trigger is properly investigated.
How to disconnect a trigger from an application is explained in the following steps:
- First you identify the erroneous trigger that is connected to your application (in this example it’s Test1). Here you see that the Test1 trigger is connected to the application named Liseberg app under the Applications column.

- The you click on the Edit button.

- You’ll navigate to Edit trigger page. There under the first section (Applications), you can see that the Liseberg app application is added to this trigger. Then you click on the cross to the right on the Liseberg app button.
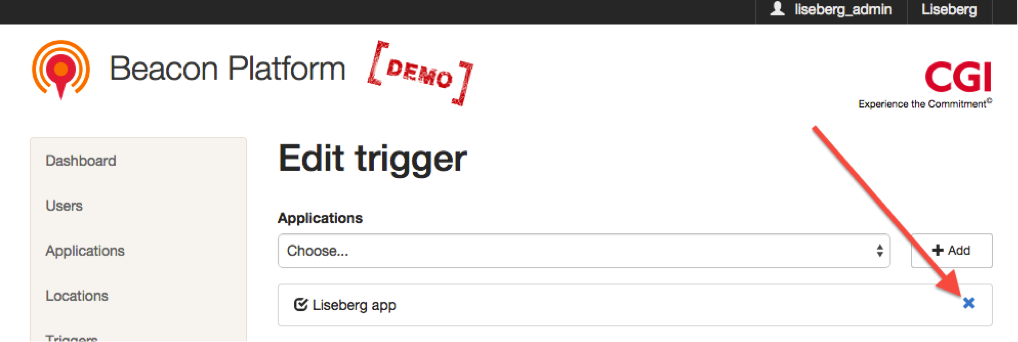
- Then you save the edited trigger by clicking on the Save button on the bottom of the page.

- Go back to the Triggers page and verify that the update of the trigger is completed by the Applications column field on the Test1 trigger beeing empty. Then you have successfully removed the connection between the trigger Test1 and the application Liseberg app.

Done.
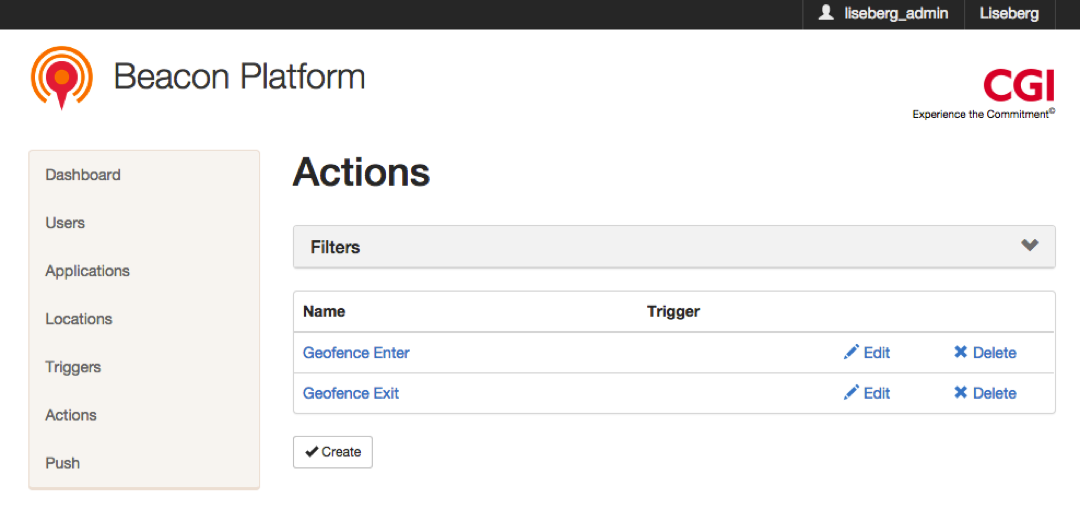
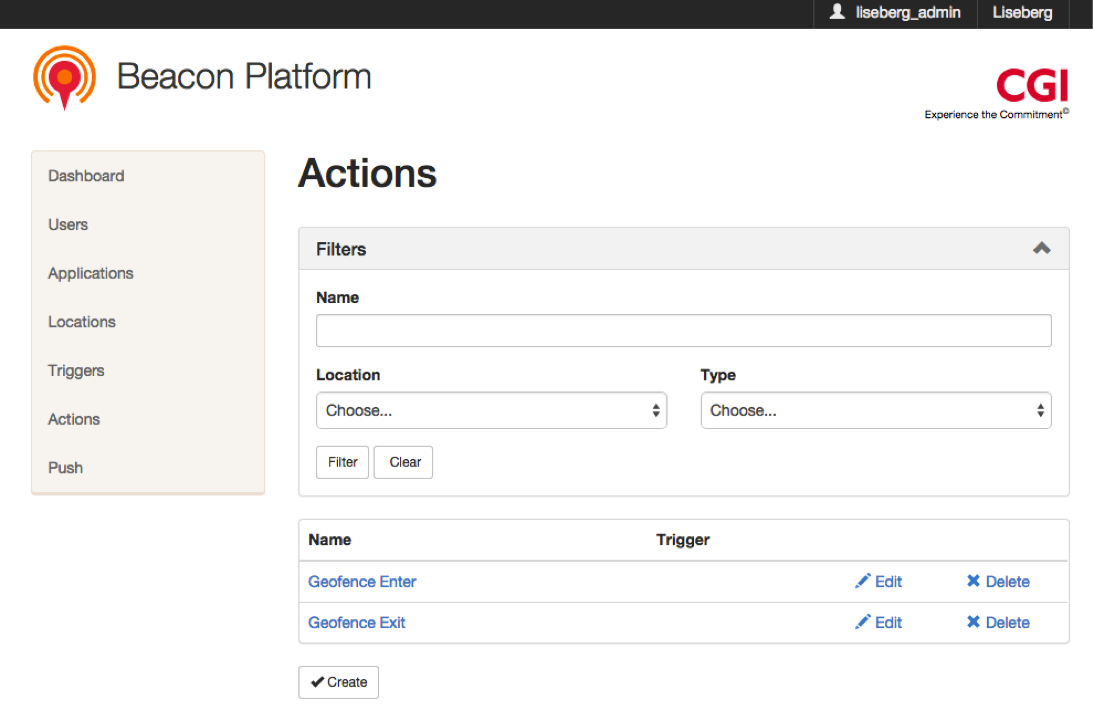
Actions
On the Actions page you see a list of actions that are created on the current account. An action is an event that will occur on the smartphones that come within the range of a beacon or within the geographic area of a geofence. For beacon actions to work must the smartphone have support for beacons, have the requested app installed and the beacon function turned on for that app.
As seen on the image below there are two actions on this account. None of the actions have connections to any trigger as seen under the Trigger column.
Filter actions
On the top of the Actions page you can filter the list of actions if you click on the grey Filters field.
There are three options that the list of actions can be filtered on: Name, Location and Type. The Name option is a text field where you can fill in a text and search for matches in the names of the actions in the list. The other two options are pickers where you can filter on a specific Location or Type. If you leave an option picker on the deafult Choose.. setting then the list of triggers won’t be filtered on that option (default behavior). You can also combine the different filter options.
When you have filled in your desired settings, you click the Filter button to apply the filter on the list. If you want to clear all the filter settings back to the default setting, click the Clear button.
Create action
To create new actions you click on the Create button on the bottom of the Actions page. You’ll navigate to the Create action page. On this page all options for creating a new action are presented. We’ll go through the options in detail in the following sections.
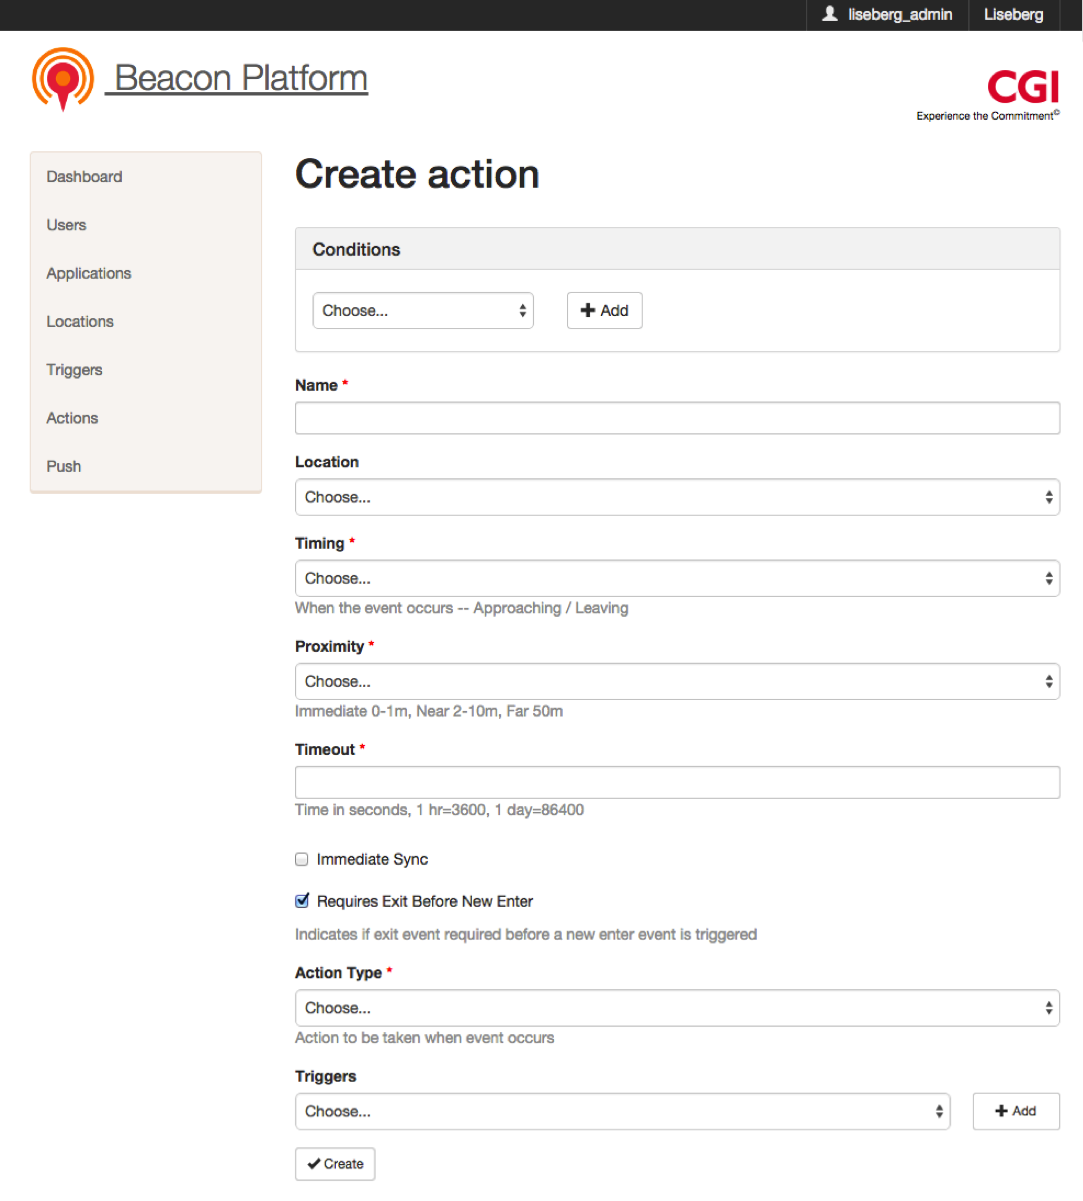
Conditions
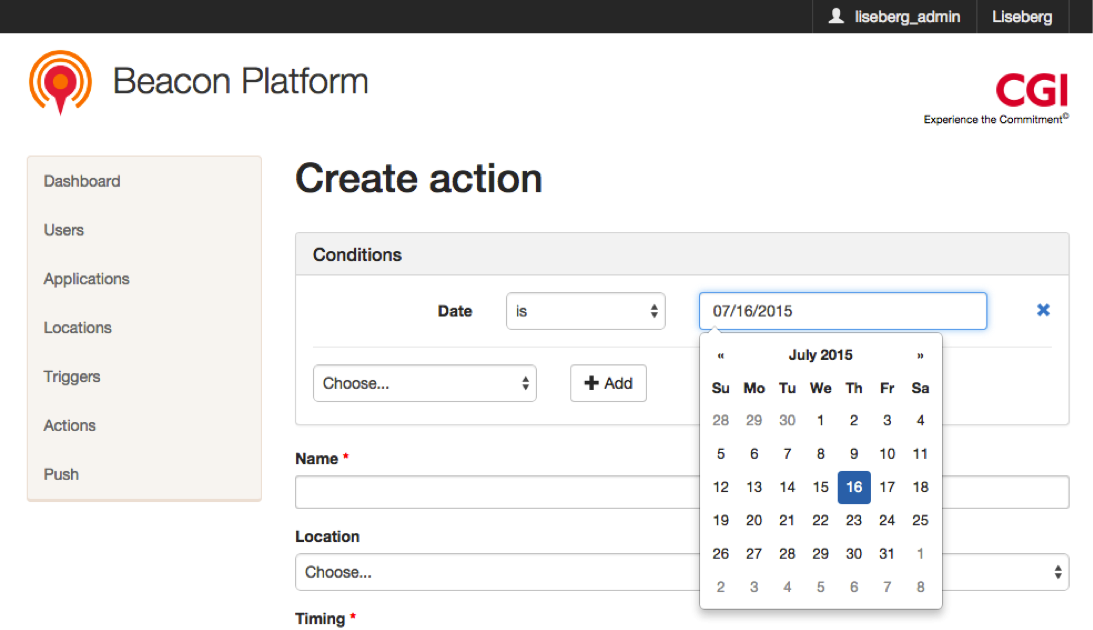
Under this section you choose under which limiting conditions the new action will be active. The conditions types are shown when the picker saying Choose... is clicked. The conditions types are (as shown in the image below): Date, Time, Day of week, Platform and Client Property.
Then you make your choice and click the Add button to add a condition.
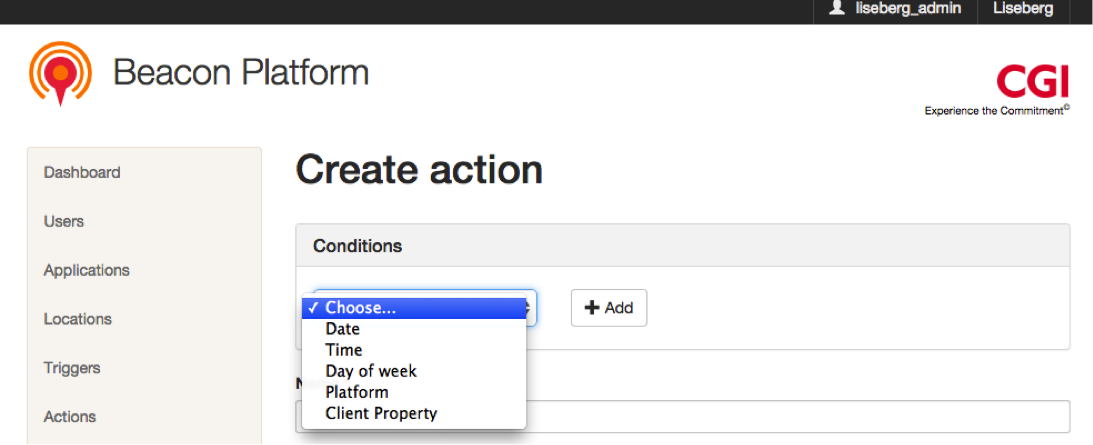
You can add more conditions and combine them, both of the same type or of different types. You can e.g. add multiple dates for the same action by just adding more date conditions.
You don’t have to add any conditions and then the action will behave in the default manner and be active for all platforms all the time.
Date
If you choose this condition the new action will have a date condition. On the first picker you choose if the new action will be active:
- a specific date (is)
- before a specfic date (is before)
- after a specific date (is after)
- between two dates (in between)
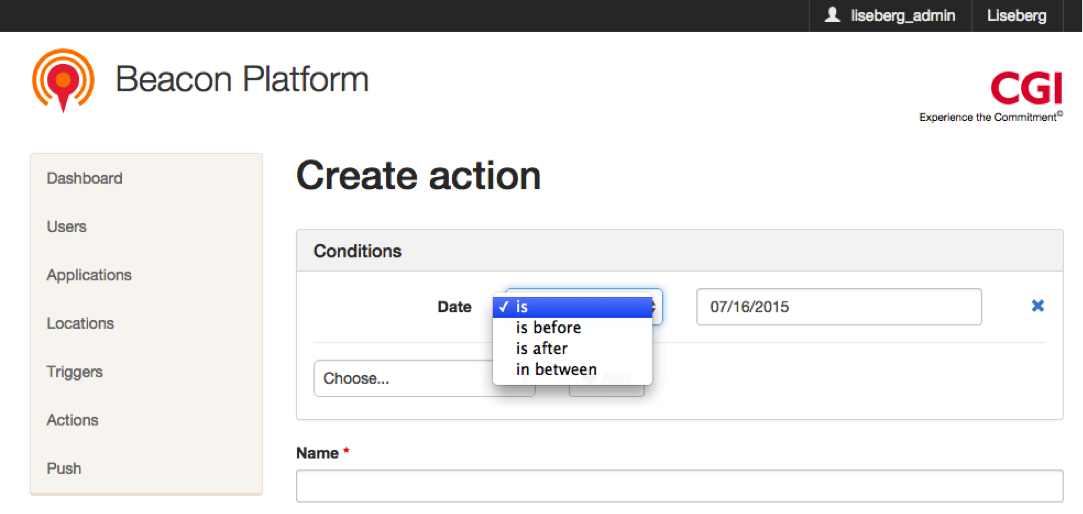
On the second (and possibly third) picker you choose the actual date(s) for the date condition.
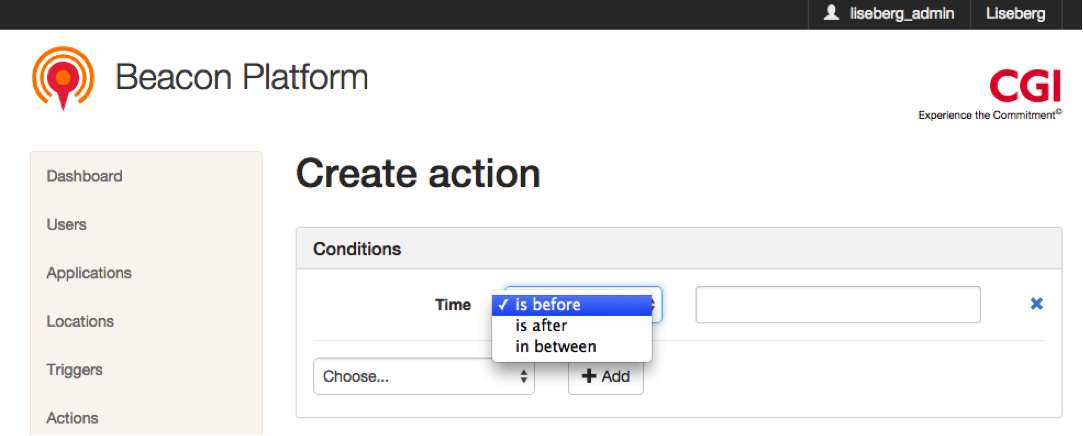
Time
If you choose this condition the new action will have a time condition. On the first picker you choose if the new action will be active:
- before a specific time in the day (is before)
- after a specific time in the day (is after)
- between two times during the day (in between)
The time is then entered in the text field with the format hh:mm (e.g. 17:15).
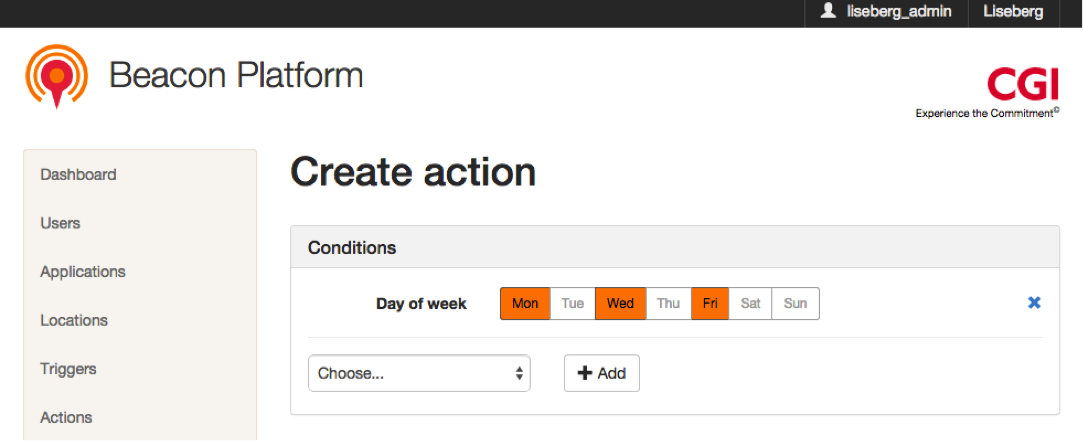
Day of week
If you choose this condition the new action will have a condition depending on what day of the week it is. Here you click on the weekdays you want the new action to be active for (orange color marks the activated days). You can choose any combination of weekdays.
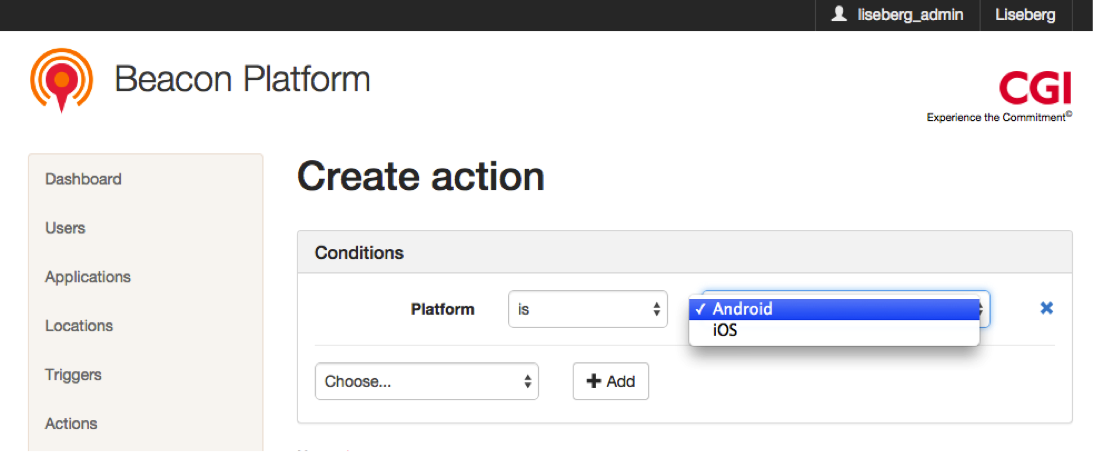
Platform
If you choose this condition the new action will have a platform condition. On the first picker you choose if the new action:
- will be active for specific a platform (is)
- will not be active for a specific platform (is not)
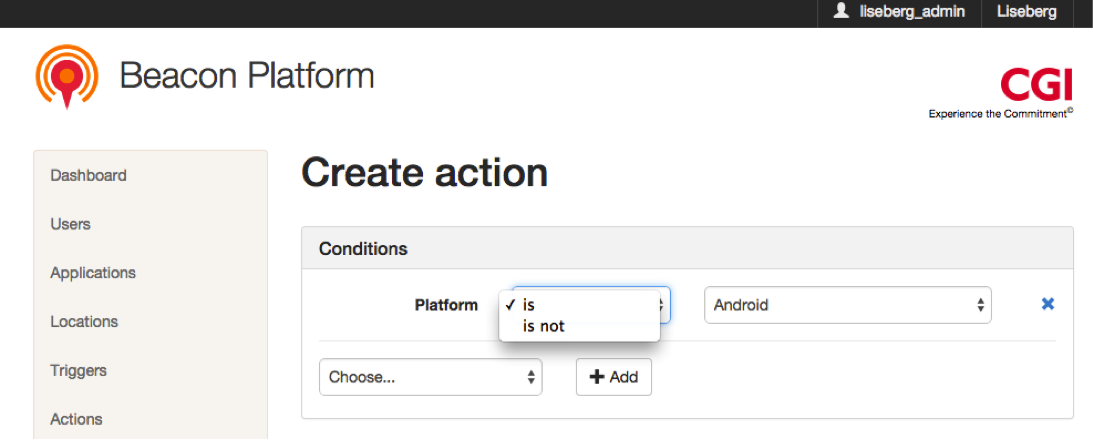
On the second picker you choose the actual platform for the platform condition (Android or iOS).
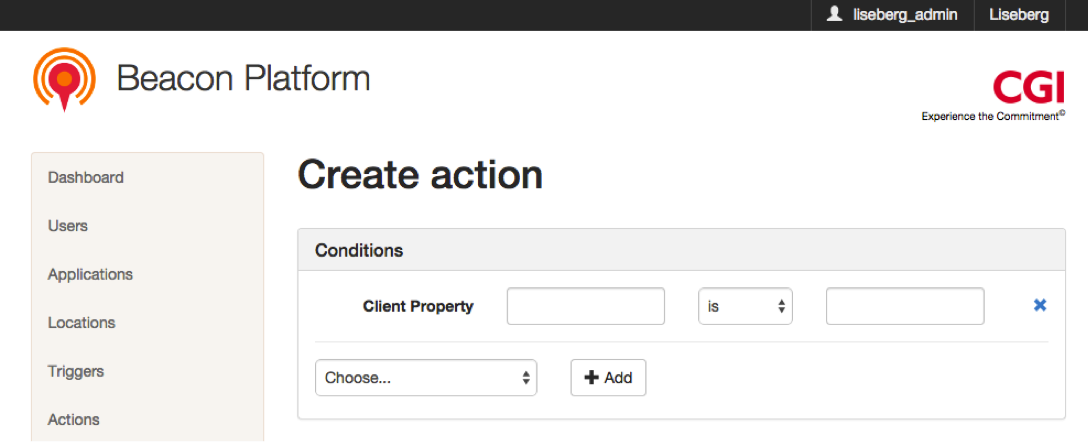
Client Property
If you choose this condition the new action will have a extra custom key-value pair depending on your specific app. E.g. if your app has a login solution with the Facebook API and you would like to send the Facebook ID of the user with an event in the Framework, this could be done with the Client Property function. In that context could this new action be conditioned on the Facebook ID string.
In the first text field you specify the name of the Client Property key.
On the picker you choose if the new action:
- will be active if the Client Property value is exactly the specified text (is)
- will be active if the Client Property value contains the specified text (contains)
In the last text field you type in the specified text for the condition.
Name
Here you set the name of the new action. You fill in the name in the text field. This action attribute is required.

Location
On this picker the location of the action is set. This is not a required attribute so this can be set at a later time or left empty.

Timing
On this picker the timing of the action is set. The two timing choices are that the action will be activated:
- when the smartphone is approaching (Approaching)
- when the smartphone is leaving (Leaving)
This setting is required and should normally be set to Approaching (for the event to occur as soon as possible).

Proximity
On this picker you set the proximity of the smartphone to the beacon when the new action sholud be activated. The four proximity choices are that the action will be activated:
- at any distance within the beacon transmission range (Any)
- in the immediate proximity, within a few centimeters (Immediate)
- in near region of a beacon, within a couple of meters (Near)
- in region further away from the beacon, greater than 10 meters away (Far)
This setting is required and should normally be set to Any (for the event to occur at any distance from the beacon). The Immediate choice could be used if you would like the user to actively place their smartphone on top of the beacon for a more user controlled action.

Timeout
In this text field you fill in the amount of timeout time the new action should have, i.e. the time the client waits before trying to send a new event at the same beacon. The filled in time should be given in seconds. The setting is required and should normally be set to 1 day in seconds, i.e. 86400.

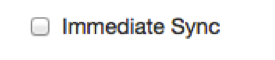
Immediate Sync
In this checkbox you choose if the app should send the event right away to the server or if you could allow the platform to batch som events before sending them to the server. The later is better for the server in a performance point of view, so this checkbox should normally be unchecked.
Requires Exit Before New Enter
This setting controls if the app should wait to send a new Enter event (the user has entered a trigger area) to the server, before the server gets an Exit event (the user has left the trigger area). This attribute doesn’t have much importance if the Timeout time is set to a high value (e.g. 1 day), because in reality the user must have been staying in the range of a beacon for over a day before a new Enter event is sent.
Special case: If the Timeout time is set to something low (e.g. 1 hour) and you would like the client to get repeated events at the same beacon everytime the Timeout time is up, you should not have this option set.
In conclusion you should normally have this checkbox checked, unless you want to have multiple events at the same beacon every time the Timeout time is up.

Action Type
At this setting you must decide which Action Type that should be activated for this new action. In the image below you see the options for this settng. The two most commonly used are Show Message and Show Webpage.
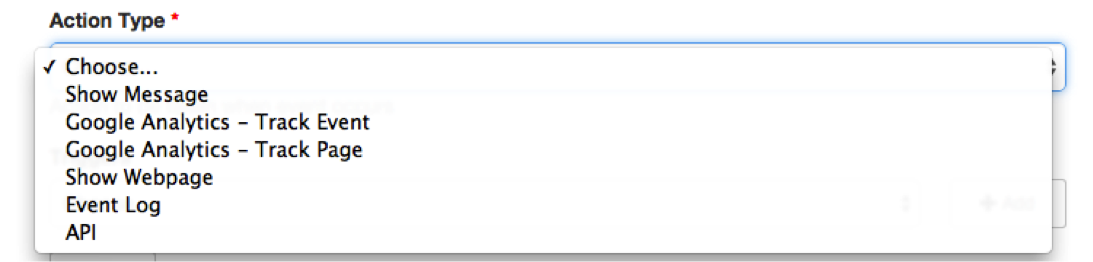
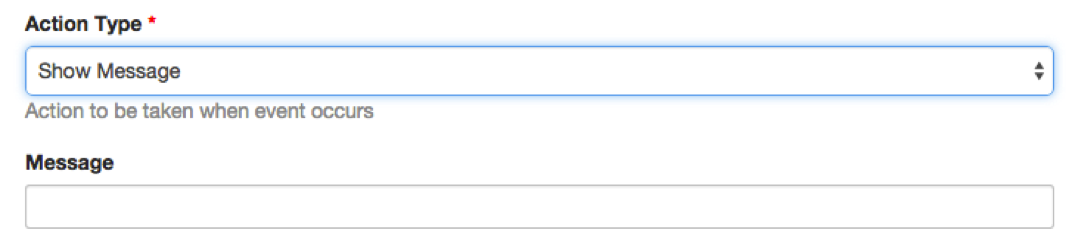
Show Message
This option is used to show a simple message (e.g. in the notice field in iOS). This message is filled in the text field Message that is exposed when this choice is made.
Google Analytics - Track Event
This option is used to send statistics to Google Analytics about what event in the app the user last made before the app sent this event. This option is not used for the moment.
Google Analytics - Track Page
This option is used to send statistics to Google Analytics about what page in the app the user last visited before the app sent this event. This option is not used for the moment.
Show Webpage
This option is used to allow the app to show the user a web page when this new action is activated. There is also possible to choose if the user should be warned before the actual web page is shown. This is done by showing a warning message before the actual showing of the web page. When the Show Webpage option is chosen, the following fields are exposed:
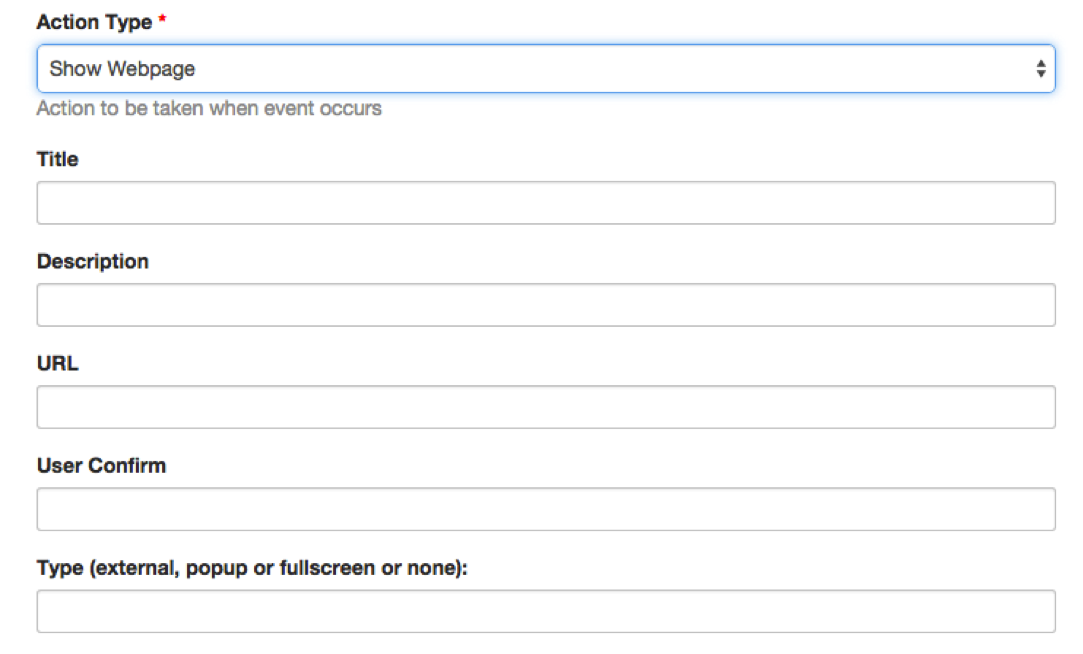
- Title
- In this text field you fill in the title of the warning message.
- Description
- In this text field you fill in the message of the warning message.
- URL
- In this text field you fill in the URL address to the web page.
- User Confirm
- In this text field you fill in if there should be a warning message | at all.
- Type
In this text field you fill in the way the web page is supposed to be shown. The following modes are available:
- If you want the web page to be shown in an external web browser (Mobile Safari on iOS), you type in external
- If you want the web page to be shown inside your app in a small window, you type in popup
- If you want the web page to be shown inside your app in fullscreen mode, you type in fullscreen
- If you want the web page to be loaded in the background, you type in none
Event Log
Is used for collecting statistics about phones in the range of a specific trigger.
API
Is used for sending API calls to other systems. This feature is not used at the moment.
Triggers
This setting is optional and is used to connect triggers to an action directly during the creation of an action.

Push
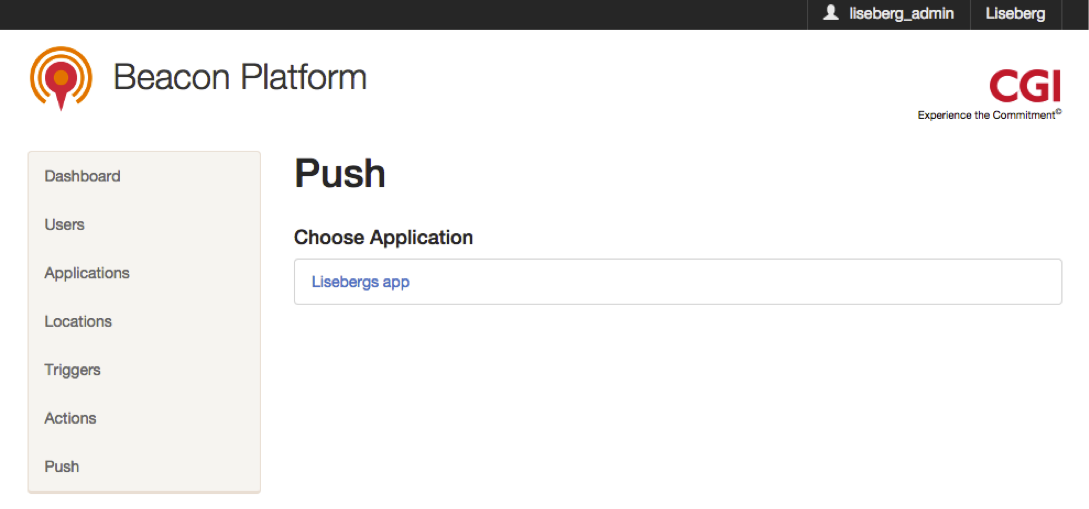
On the Push page you can see a list of applications that are created on the current account. Through this page it’s possible to send push notifications to a specific application. In this case you click on the only available application named Liseberg app and you’ll navigate to the push creation page.
Note
Your administration interface must support push notifications, for you to see the push option in the side menu.
On the image below, you see the choices that can be made for a new push notification. The three settings are all required and are described in the following sections. After making your choices you click on the Send button to send the push notification.

Location
In this picker you have to select to what Location to send your push. This location is not the same as Locations mentioned in earlier sections, but is a geoposition condition that the smartphones possibly can fullfill. In the case shown in the image below there are three options:
- send to all smartphones, both inside and outside Liseberg All
- send to all smartphones inside Liseberg Inside Liseberg
- send to all smartphones outside Liseberg Outside Liseberg

Platform
In this picker you have to choose the desired platform(s) to send the push notification to. There are three options:
- send to all smartphones, both iOS and Android All
- send to Android smartphones Android
- send to iOS smartphones iPhone

Message
In this text field you type in the actual text message to be sent through this push notification.
